Thursday, August 20, 2015

Tuxedo Bow タキシードリボン


Hi bow making friends! こんにちはみなさん!Today I'm going to show you how to make a tuxedo bow. I love this bow! It's one of the most versatile bows. You can do a variety of things with it to change the way it looks. 今回はタキシードリボンの作り方をご紹介します。私の好きなリボンです。アレンジがたくさんできるリボンのひとつなので見た目を変えることで様々な使い方できますよ。

Let's get started! Gather all your materials. You'll need the following:
それでは始めましょう。 まず材料を準備します。材料:
- Scissors ハサミ
- Ruler 定規
- Lighter ライター
- 10" of 1.5" ribbon  3.8cm幅のリボン10インチ
- 4" to 6" of 3/8" ribbon (used for your center ribbon)  1cm幅のリボン10cmから15cm(リボンの真ん中に使います)
- Lined hair clip or hair tie** 裏地ついたヘアークリップ 又は、髪どめようゴム**
- Threaded needle 縫い針
- Glue gun and glue sticks グルーガン 特に グルースティック

**if you have never lined a clip before, please refer to my previous blog - LINING A HAIR CLIP.
**今までにヘアークリップに裏地をつけたことのない方は前回のブログ ヘアクリップに裏地を付ける  を見てください。

First cut your 1.5" ribbon to 10" and cut your 3/8" ribbon to 6".  Use your lighter to seal the ends. まず、3.8cm幅のリボン10インチと1cm幅のリボン6インチに切ります。ライターを使い、切ったリボンの両端を整えます。

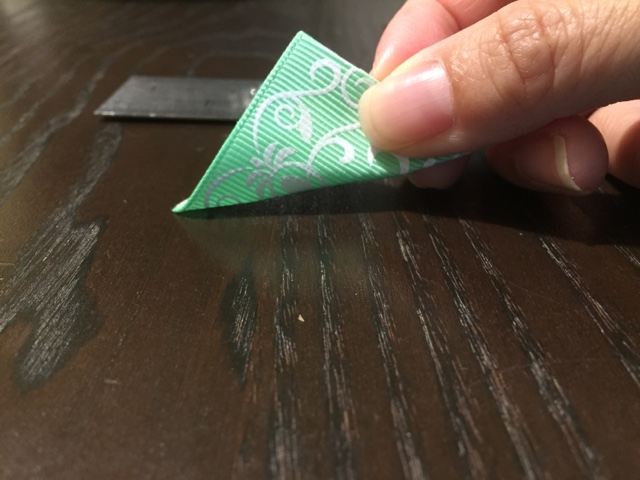
Next, take your cut 1.5" ribbon and fold it in half lengthwise and crease the center.  Open the ribbon up and you should still be able to see your crease.  If it is difficult for you to see your crease, go ahead and take a pencil or pen and draw a line on the crease on the backside of the ribbon.  Don't worry, you will not be able to see this line when you are finished with your bow. 次に、切った3.8幅のリボンをとり、半分の長さに折り、真ん中に折り目をつけます。リボン開き、その時折り目がみえると思います。もし、見えにくければ、鉛筆などでリボンの裏側に折り目の上に線を引きましょう。完成した時には、見えなくなるので大丈夫です。

Fold over one side of the ribbon slightly going over the center line/crease.  リボンの片側を真ん中の折り目(線)よりも少し奥に折り込みます。

Repeat on the other side.  もう一方も同じようにします。織り込んだ側がリボンの裏側になります。

This will be the back of your bow.  Take your threaded needle and sew up the bow as pictured. Pull the thread carefully and wrap the thread around the center of the bow about 2 times.縫い針を使い写真のように縫います。糸を優しく引き、糸をリボンの中心で二度ほど巻きます。

Tie off your ends on the backside of the bow.  糸をリボンの裏側で結びます。

At this point, you will glue the 3/8" ribbon around the center of the bow, starting from the backside.  ここで、1cm幅のリボンをリボンの中心にリボンの裏側からのり付けします。

Then, glue your lined hair clip to the back of the bow.  You are done! そして、裏地つけしたヘアークリップをリボンの裏側にのり付けします。これで終わりです。


When attaching a hair tie, put a little glue on the center of the back of the bow.  ゴムをつける時は、のりを少しリボンの裏側につけます。

Attach the hair tie to the glue and hold it for a few seconds while the glue hardens. そしてゴムをのりに付け、のりが固まるまで数秒押さえけます。

  Then attach a little more glue on top of the hair tie at the center of the back of the bow again.  その後で、ゴムの上からのりを少しつけます。

Attach one end of the 3'8" ribbon to this place.  Hold for a few seconds while it dries.  1cm幅のリボンの端を乗せ、乾くまで数秒押さえます。

Add glue on the backside of the 3'8" ribbon, little by little while wrapping it around the center of the bow.  I usually use enough ribbon to wrap around the center twice and use glue on the full length of the 3/8' ribbon.  Over time, this will help keep the bow securely attached to the hair tie.   1cm幅のリボン裏側にのりを少しづつ付けながら、リボンの真ん中に巻きつけていきます。私はいつも二度ぐらい巻けるリボンを使い、1cm幅のリボンにまんべんなくのりを付けます。

Now you have made a simple tuxedo bow on a hair tie! これをすることでゴムをしっかりとリボンとつけることができます。これで基本のタキシードリボンの完成です。

Here are some other examples of what you can do with a basic tuxedo bow.  By stacking them and placing them side by side.....you can greatly change the look and complexity of the bow!  So many great possibilities! 基本のタキシードリボンを使ってできることを幾つか載せておきますね。これらのものを付けたり、横に付けることにより見た目を変えて複雑なデザインのリボンを作ることもできますよ。楽しみ方はアイディアにより無限ですよ!是非、あなたのオリジナルを見つけてください!

Happy bow making everyone!
みなさん、リボン作り楽しんでくださいね。

**翻訳者 - D.I. & M.H. & E.K.


Wednesday, August 19, 2015

How to make a Tsumami (Hana) Kanzashi つまみ細工 剣つまみ


Hi ladies!  It’s Cheryl here! Let me share with you all a little about myself.  I am a Chinese-American born and raised in the states. I have been living in Japan now for almost nine years. In my time here, I have learned a lot about the Japanese culture and have come to appreciate some of the unique aspects they have to offer.  こんにちは、シェリルです。少し私の自己紹介をさせてください。私は中国系アメリカ人でアメリカで生まれ育ちました。日本住み始めてもう九年になります。日本での生活していく中で、日本の文化をたくさん学び、いくつかの興味深い側面も学べたことも感謝しています

In the month of August, there are firework and summer festivals happening all throughout Japan.  At these festivals, you can see ladies of all ages wearing yukatas (similar to kimonos).  In their hair, you can see ladies wearing different styles of kanzashi.  It is a beautiful sight to see! 8月の夏休み中は、日本全国で花火大会や夏祭りが日本全国で開催され、そのお祭りでは浴衣姿の女性を目にすることがあります。彼女達の髪には、様々な簪(かんざし)をを付けているのを目にします。とても美しい光景です。(The following four pictures were taken by my talented friend of Todd Fong Photography; www.toddfong.com)


In the recent years, making tusmami kanzashis have become a popular trend in the ribbon world (tsumami = hand crafted; kanzashi = ornamental hairpin).  The Japanese started making kanzashi over 200 years ago during their Edo period.  Traditionally, it was made with having only a pair of tweezers, silk cloth and glue. 最近では、リボンの世界でつまみ簪(かんざし)を作ることが人気になっています。簪(かんざし)は日本で作られ、その歴史は200以上も前の江戸時代にさかのぼります。伝統的に、簪(かんざし)は一つのピンセットと絹と糊で作られました。
Today I will be showing you the modern way of making a ken (pointed) tsumami kanzashi今回はモダン剣つまみ簪(かんざし)の作り方をご紹介します。

First gather all your material 材料:
Tweezers ピンセット
Ruler 定規
Ribbon (1.5” width) リボン(1.5インチ幅のもの)
Lighter ライター
Needle and thread 針と糸
Lined hair clip (or something else to attach your flower to) ラインヘアークリップ(または花が取り付けられるもの)
Embellishment for your center 真ん中に付ける装飾品
Felt circle (about ¾” in diameter) 丸いフェルト材(直径だいたい3/4インチ)
Glue gun and glue stick グルーガンとグルースティック
Bowl with water** 水の入ったボール**
**The bowl with water is to have near you if your ribbon catches on fire.  This way you have water close by that you can use to extinguish a fire quickly, if necessary. **水の入ったボールはリボンに火がつい場合のために手元においてください。すぐに火を消すことができ、安全です。

First, cut 8 pieces of ribbon to 1.5”.  Basically you will be making 8 symmetrical squares. 1.5インチ幅のリボンを8つ切ります。基本的に8つの左右対称の正方形を作ります。
 Heat seal all your ribbon ends. 全てのリボンの切り端をライターで整えてください。
Next, take one piece of ribbon.  With print side out, fold in half to make a triangle. 次に、リボン一切れを取り、模様がついている側を外にして三角形に折ります。
Fold it again to make a smaller triangle. もう一度折り、小さな三角を作ります。
Fold it once more to make an even smaller triangle. 更にもう一度折り込み、更に小さな三角を作ります。
The edge of the triangle that has 3 folds of ribbon, will become the top of your flower petal.  The edge of the triangle with only edges, will become the bottom of your flower petal. 三角形の折り目の面が花びらの上になります。そして、反対側のリボンの端がまとまっている方が花びらの下になります。

Take your scissors and cut off about 1/8” from the tip of the triangle. ハサミで三角形の先端を1/8インチほど切ります。
Take your tweezers and use it to hold the ribbon firmly at the place where you just made a cut.  Use your lighter to slightly melt the edges together.  When the ribbon has cooled, remove the tweezers.  The ribbon should now be sealed together.  If it is not, repeat the last step. ピンセットを使い、ハサミで切った場所をしっかりと掴みます。ライターを使い、切った場所の角を少し熱を加えて閉じます。リボンが冷めたら、ピンセットを離します。リボンが接着できていると思います。もし、接着できていなければもう一度同じ作業を繰り返してください。

Next, cut off another 1/8” of ribbon from the bottom of the flower petal at a slight angle. 次にリボンの花びらの下側の部分を少し斜めの1/8インチ切ります。

Once again, take your tweezers to hold the ribbon.  You will use your lighter and heat seal the ribbon (this time you do not want to seal all the edges together). 再び、ピンセットを取りリボンを掴みます。ライターを使い、熱してリボンの端を整えます。(今回は全ての角を接着しないようにしてください。)

Here is a picture of a cut and uncut flower petal. 切った花びらと切っていない花びらの写真です。
You now have completed one flower petal!  Repeat this process for the remaining 7 pieces of ribbon trying to make each petal equal in size and shape.  これで一つの花びらが出来上がりです。残った7つのリボンの材料を同じ大きさと形になるように同様の作業を繰り返します。
Using your needle and thread, you will thread all 8 flower petals together by putting your needle through the tip of each flower petal. 縫い針と糸を使い、全ての花びらの先端に糸を通して8つの花びらをつなげますよ。

Tie the two ends of your thread together. 糸の両端を結びます。

Take your felt and glue it to the back of your flower. フェルトを取り花びらの後ろにフェルトを糊付けします。

Next glue your flower to your lined hair clip. 次に花とラインヘアークリップを糊付けします。


Lastly, glue your embellishment to the center of your flower.  You are all done!  Now you are ready to go to a summer festival in Japan!! 最後に、花の真ん中に付ける装飾品を糊付けします。これで完成です。これで今年の夏祭り準備が整いました。


**翻訳者 - D.I.