
Hi ladies!
Have you all seen the latest bow craze?? It's all about the octopus bow! こんにちは!オクトパスボウの作り方を教える。色んな作り方が有る。これは私の方。申し訳ありません。全て英語で。もし質問があれば、ぜひメッセージして下さい。

I'm sure there are several ways to do this, but today I'm going to show you all how I do it and also give you a few tips I picked up while making these beauties!! Basically this bow requires you to make 2 twisted boutique bows. I honestly have never been very good at making these but with this bow, the shape is a little more forgiving. There are several was to make a twisted boutique bow (TBB). The way I will show works the best for me for the octopus bow. This is not how I usually make my TBBs. This method helps me to ensure my loops are all the same length which helps me achieve the look in the picture above.
Before we get started, check out these 2 videos. The first one is by Rosa Solorzano. This was the original video I first saw a few months ago when I became interested in this bow. This video is not in English. https://www.youtube.com/watch?v=Uz8VEW-Y0SY
This second video is by Nicole Royal. Once Nicole posted her finished bows and her video, this craze has gone wild!! https://www.youtube.com/watch?v=5vdMkuNHJvQ

Here is what you will need to make the octopus bow using the technique I will show. You will use 7/8" ribbon and your finished bow will be 3" x 3". A must is the template!!!
- 7/8" ribbon
- a 4" wide template (Mine is a store bought one. You can easily make one yourself using strong cardboard. Make sure you have a slit down the middle big enough to put a needle through without touching the template.)
- a lighter
- a glue gun and glue sticks
- a ruler
- scissors
- a pin
- alligator clips (at least one)
- strong thread (a needle if you prefer to sew)
- a salon clip (optional)
- tweezers (optional, not pictured)
- lined hair clip/barrette or hair tie to attach the bow to (not pictured)

Here is what my template looks like.

These are some of the measurements I played with. This chart is for smaller sized bows. you can easily use a larger width template and adjust the ribbon length to make the bow larger. (I think with a longer length of ribbon, your bow will look a little more like a really octopus with legs flailing!)

Cut your ribbon to 18.5". If you don't want a tail, or a shorter tail, you can cut this to about 18" or less. I don't cut my tails at a slant or with a v-cut. You can play with it and see which way fits you best.

Heat seal your ribbon ends carefully using your lighter. (Make sure to always do this near water just in case of any mishaps.)

Put your ribbon lengthwise across the bottom of the template, making sure it is parallel with the bottom. Place the ribbon to almost about 3/4" across the middle slit. Use an alligator clip or something of the sort to hold the ribbon in place towards the edge of the right side of the ribbon.

On the left side, fold the ribbon around the back.

Continue to fold the ribbon around the front on the right side of the template. You will now have gone around the template completely one time. Make sure you hug the edges of the template, but not too tight that you cannot slide off the ribbon in the end.

Wrap the ribbon around the back once more.

And then around the front. Again, make sure you hug your template edges. This is one way to ensure your loops stay even.

Take your alligator clip off from under and clip the ribbon again holding all the layers together this time. This is a chance to realign your ribbon if it is not hugging the template enough or if it is wound too tightly around the template.

Take your pin and place it through the middle slit making sure it is centered between the top and bottom of the width of your ribbon.

Take off the alligator clip.

Slip the ribbon off the template keeping the pin in place.

Flip the ribbon bundle so that the edge of the ribbon it is pointing up. Do not remove the pin. I am right handed so for a left handed person, this may not work as well.

Put your thumb on the pin in front to hold it in place. Using your other hand and fingers, fan out the ribbon as shown. The ribbon edge will point to the left with the bottom outer ribbon loop pointing right. The bottom inside loop will be pulled out towards the left.

As you pull the loops out, you slowly will achieve this shape. At this point, you have somewhat of a boutique bow. If you stop at this point, without pulling out your loops further, you can still make the octopus bow.....but your final look will be a bit different. (You can see the difference in my picture down below.) Again, keep that pin in the dead center! That will be what keeps all four of your loops even in length.

You want to fan and pull out your loops even more. This is what you should end up with. This is a twisted boutique bow (TBB).

Carefully take out the pin without losing your grip on the bow.

I then fold the center so that you end up with a valley/dip in the middle and two mountains/peaks.

I then wrap strong thread around and tie it off. Look at your loops and see if they are all even lengths. If they are not, use your tweezers/hands and shift the center thread.

Another way is to use a larger salon clip and clamp it on the center of the bow. Thread string around the center a few times. Pull and tie off. You can also sew your center. (I usually sew my center when making a TBB).
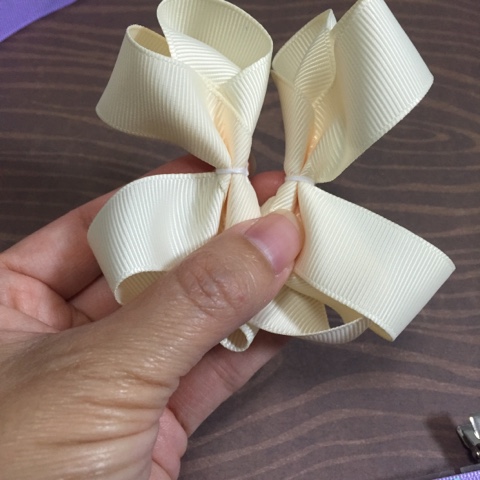
Repeat the steps again and make one more TBB. Take the two TBBS and place them side by side.

Tie the two pieces together. For this one, I have both my TBBs with their tails pointing in towards the center. (In the picture below, you will see one with tails pointing outwards.)

When I tie the two bows together.....I have found that the center where the bows meet can shift and the bows become misaligned. I didn't like the way things sometimes shifted.


So I know put a dab of hot glue in the center to keep the two bows in place. Now, all you need to do is wrap ribbon around the center to your liking and add any embellishments you would like. Make sure you shape your bow!!!

Here are what 3 different completed bows look like using the same template and lengths. Just by making some slight changes in your bow shape or which edges you put together, your bow result will be different. Make sure you shape your bows in the end, just like you would do with a twisted boutique bow. As you can see, I still need a little work with my shaping. I didn't spray my bows with hairspray or a stiffener. I am going to try that at some point and see if that'll help with the shaping. I also haven't double layered my ribbon yet. Of course that is something I need to try yet. With 7/8' ribbon, I was trying not to keep the center too bulky!!
Below are a few more that I have made using glitter and foil ribbon. With glitter foil, it is a little harder to get the shape to stick......just like in a twisted boutique bow! I am still struggling with it!


Good luck ladies! Let me know if you have any other questions or need any help! Thanks for taking a look! I would love to see your bows!
Maravilhoso!!!!
ReplyDeleteMaravilhoso!!!!
ReplyDeleteLindo gostei do modo como foi feito. vou fazer para minhas neta.
ReplyDeleteBeautiful pita,l like it
ReplyDelete